Post 3: Exposing Kubernetes to the internet with Cloudflare tunnels


In the last post we deployed Ghost, a content management system for a blog. In this article we'll be discussing ways to expose our blog to the internet.
The traditional way to expose something running on a home network to the internet would be to punch a hole through the home firewall to allow the outside internet access to the specific server on the home network. However, this comes with a few drawbacks:
- Your home's IP address is exposed to anyone who knows the web address of your blog
- Any allowed access to the internal network from the outside world could be a potential vulnerability. It is safer and simpler to have a standard firewall (which denies all inbound traffic) than one that allows some traffic through.
Further, in order to HTTPS secure the blog we need to obtain trusted certificates from a 3rd party certificate authority.
An alternative method is to use a tunnel service, such as Cloudflare's Argo tunnels. Here, a program that runs on your local network (cloudflare daemon) makes a connection with Cloudflare's servers. When users connect to the site, they are connecting to Cloudflare's servers, which then redirects the connection to the home network. Your home IP is not exposed, no firewall holes are required, and Cloudflare handles issuing HTTPS certificates.
Setting up Ghost
We're going to uninstall ghost.
helm uninstall ghostThis won't delete everything; we need to delete the PersistentVolumeClaim created by Ghost as well.
kubectl get pvc
NAME                 STATUS   VOLUME                                     CAPACITY   ACCESS MODES   STORAGECLASS   AGE
data-ghost-mysql-0   Bound    pvc-eff97035-0ffb-4415-8c64-088239c88e10   8Gi        RWO            default        46h
kubectl delete pvc data-ghost-mysql-0
persistentvolumeclaim "data-ghost-mysql-0" deleted
Next we'll be creating a values file for the Ghost install:
cat <<EOF > ghost-values.yaml
service:
  type: ClusterIP
ghostHost: ghost.acgandhi.com
ghostEmail: youremail@example.com
ghostPassword: mustbemorethan10chars
EOFAnd then finally (re)installing ghost:
helm install ghost bitnami/ghost -f ghost-values.yamlYou can run kubectl get po,svc to see which pods and services are created by Ghost. Unlike last time the Ghost service is of type ClusterIP instead of LoadBalancer. If you want to test the installation, you can use kubectl port-forward, and then access the website at jumpboxVMIP:8080.
kubectl port-forward svc/ghost 8080:80 --address 0.0.0.0Installing Cloudflare Tunnel
If you don't have one already, you will need a domain name. It can be from any registrar, such as Google Domains, Namecheap, GoDaddy, Hover, etc. Follow Cloudflare's instructions to add your site and change your domain name to use Cloudflare as its authoritative DNS.
Next we have to install the cloudflared on our jumpbox. For more information look at Cloudflare's documentation.
# download binary
wget https://github.com/cloudflare/cloudflared/releases/latest/download/cloudflared-linux-amd64 -O cloudflared
# allow execution
chmod +x cloudflared
# move into path
sudo mv cloudflared /usr/local/bin/
Afterwards you can login, and then create the tunnel resource.
cloudflared tunnel login

cloudflared tunnel create ghostdemo
Tunnel credentials written to /home/tceadmin/.cloudflared/7e87f3da-29da-4a99-a4f0-ca7eafffec9d.json. cloudflared chose this file based on where your origin certificate was found. Keep this file secret. To revoke these credentials, delete the tunnel.

Created tunnel ghostdemo with id 7e87f3da-29da-4a99-a4f0-ca7eafffec9d
ghostdemo to whatever you want to call your tunnel.Next you'll upload the tunnel credentials created to Kubernetes.
kubectl create secret generic tunnel-credentials \
--from-file=credentials.json=/home/tceadmin/.cloudflared/7e87f3da-29da-4a99-a4f0-ca7eafffec9d.jsonThen, we're going to create two DNS records: one for the blog itself, and another for Cloudflared's hello_world test service. You can use the cloudflared CLI or manually add CNAME records targeting <tunnelid>.cfargotunnel.com. I ran into issues with the manual record creation and so I recommend the command line approach (it's easier, too!).
The command syntax is cloudflared tunnel route dns <tunnel> <hostname>. So, in my case I ran the following two commands:
cloudflared tunnel route dns ghostdemo ghostdemo.acgandhi.com
cloudflared tunnel route dns ghostdemo helloworld.acgandhi.com
If we look on the Cloudflare web console we can see that both of these records are created:
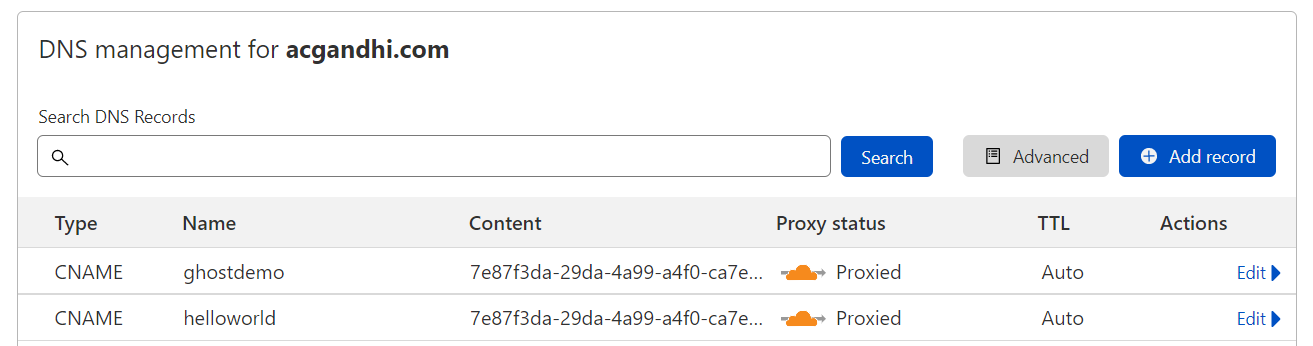
Finally we're ready to deploy cloudflared on Kubernetes. Copy the following text into a file named cloudflared.yaml.
---
apiVersion: apps/v1
kind: Deployment
metadata:
  name: cloudflared
spec:
  selector:
    matchLabels:
      app: cloudflared
  replicas: 2 # You could also consider elastic scaling for this deployment
  template:
    metadata:
      labels:
        app: cloudflared
    spec:
      containers:
      - name: cloudflared
        image: cloudflare/cloudflared:2022.3.0
        args:
        - tunnel
        # Points cloudflared to the config file, which configures what
        # cloudflared will actually do. This file is created by a ConfigMap
        # below.
        - --config
        - /etc/cloudflared/config/config.yaml
        - run
        livenessProbe:
          httpGet:
            # Cloudflared has a /ready endpoint which returns 200 if and only if
            # it has an active connection to the edge.
            path: /ready
            port: 2000
          failureThreshold: 1
          initialDelaySeconds: 10
          periodSeconds: 10
        volumeMounts:
        - name: config
          mountPath: /etc/cloudflared/config
          readOnly: true
        # Each tunnel has an associated "credentials file" which authorizes machines
        # to run the tunnel. cloudflared will read this file from its local filesystem,
        # and it'll be stored in a k8s secret.
        - name: creds
          mountPath: /etc/cloudflared/creds
          readOnly: true
      volumes:
      - name: creds
        secret:
          # By default, the credentials file will be created under ~/.cloudflared/<tunnel ID>.json
          # when you run `cloudflared tunnel create`. You can move it into a secret by using:
          # ```sh
          # kubectl create secret generic tunnel-credentials \
          # --from-file=credentials.json=/Users/yourusername/.cloudflared/<tunnel ID>.json
          # ```
          secretName: tunnel-credentials
      # Create a config.yaml file from the ConfigMap below.
      - name: config
        configMap:
          name: cloudflared
          items:
          - key: config.yaml
            path: config.yaml
---
# This ConfigMap is just a way to define the cloudflared config.yaml file in k8s.
# It's useful to define it in k8s, rather than as a stand-alone .yaml file, because
# this lets you use various k8s templating solutions (e.g. Helm charts) to
# parameterize your config, instead of just using string literals.
apiVersion: v1
kind: ConfigMap
metadata:
  name: cloudflared
data:
  config.yaml: |
    # Name of the tunnel you want to run
    tunnel: light-api
    credentials-file: /etc/cloudflared/creds/credentials.json
    # Serves the metrics server under /metrics and the readiness server under /ready
    metrics: 0.0.0.0:2000
    # Autoupdates applied in a k8s pod will be lost when the pod is removed or restarted, so
    # autoupdate doesn't make sense in Kubernetes. However, outside of Kubernetes, we strongly
    # recommend using autoupdate.
    no-autoupdate: true
    # The `ingress` block tells cloudflared which local service to route incoming
    # requests to. For more about ingress rules, see
    # https://developers.cloudflare.com/cloudflare-one/connections/connect-apps/configuration/ingress
    #
    # The first rule proxies traffic to the ghost installation
    - hostname: ghostdemo.acgandhi.com
      service: http://ghost.default.svc.cluster.local:80
    #
    # This rule sends traffic to the built-in hello-world HTTP server. This can help debug connectivity
    # issues. If helloworld.example.com resolves and tunnel.example.com does not, then the problem is
    # in the connection from cloudflared to your local service, not from the internet to cloudflared.
    - hostname: helloworld.acgandhi.com
      service: hello_world
    #
    # This rule matches any traffic which didn't match a previous rule, and responds with HTTP 404.
    - service: http_status:404
All the way at the bottom of the file the configuration for the tunnel is defined. Each of the entries in the ingress section of the configuration define connections between a domain name to another a local URL. In this case, they connect to Kubernetes services, using the Kubernetes DNS name of that service. The format for the DNS name is servicename.namespace.svc.cluster.local, for more info see the Kubernetes docs. Change the hostname to your domain name (the same one you created a DNS record for in the last step).
Apply the yaml.
kubectl apply -f cloudflared.yamlFinally, if you go to the hostname in your web browser (in my case ghostdemo.acgandhi.com) you should be able to see the site. You can also go to the helloworld status page (in my case helloworld.acgandhi.com) and see the cloudflare helloworld service. The blog's admin dashboard is available at ghostdemo.acgandhi.com/ghost.