Post 1: Deploying Kubernetes

We have a laundry list of services that we need to run, and we need a way to organize the running of them all. One of the hottest new technologies in the field for orchestrating applications at scale is Kubernetes (or k8s as the cool kids call it). Standing up full, managed, multi-node, high availability Kubernetes is often considered a daunting (or perhaps more accurately, dreaded) task. Having been designed to run workloads at Google scale, Kubernetes is quite complex. Luckily for us, VMware’s Tanzu platform makes managing Kubernetes quite straightforward. Tanzu Community Edition (TCE) is the free, open source version of Tanzu that still has all of the core features we will need in our homelab deployment.
Deployment process overview
The deployment process for TCE uses a bootstrap machine which runs the Tanzu CLI.
Here’s a high-level overview of the process:
- tanzu management-cluster create… is run on the bootstrap machine
- Tanzu creates a bootstrap Kubernetes cluster on the bootstrap machine, using kind.
- Providers are installed on the bootstrap cluster. These providers communicate with vSphere to provision VMs for the management cluster.
- Management cluster VMs are created.
Creating the bootstrap machine
Typically the bootstrap machine is your local computer. This requires certain software (like docker, kubectl, and the tanzu cli) to be installed on your machine. Instead of this, our bootstrap machine will be a VM on vSphere. We’ll be using a cloud-init image of Ubuntu Server as its basis. This image will be customized with a yaml file, which will install all of the necessary dependencies and the Tanzu CLI for you.
Follow the instructions by Steve Wong here to set up the bootstrap machine.
Note: if you don’t have VMware PowerCLI installed on your machine, you can just upload the OVAs to vSphere via the vCenter web ui.
Deploying TCE: vSphere prerequisites
Before deploying Tanzu, the following requirements must be met:
vSphere
- vSphere version: vSphere 6.7u3 or later, VMware Cloud on AWS, or Azure VMware Solution account
- One of the following editions: vCenter Standard, vSphere Standard, vCenter Essentials, vSphere Essential, or vSphere Essentials Plus
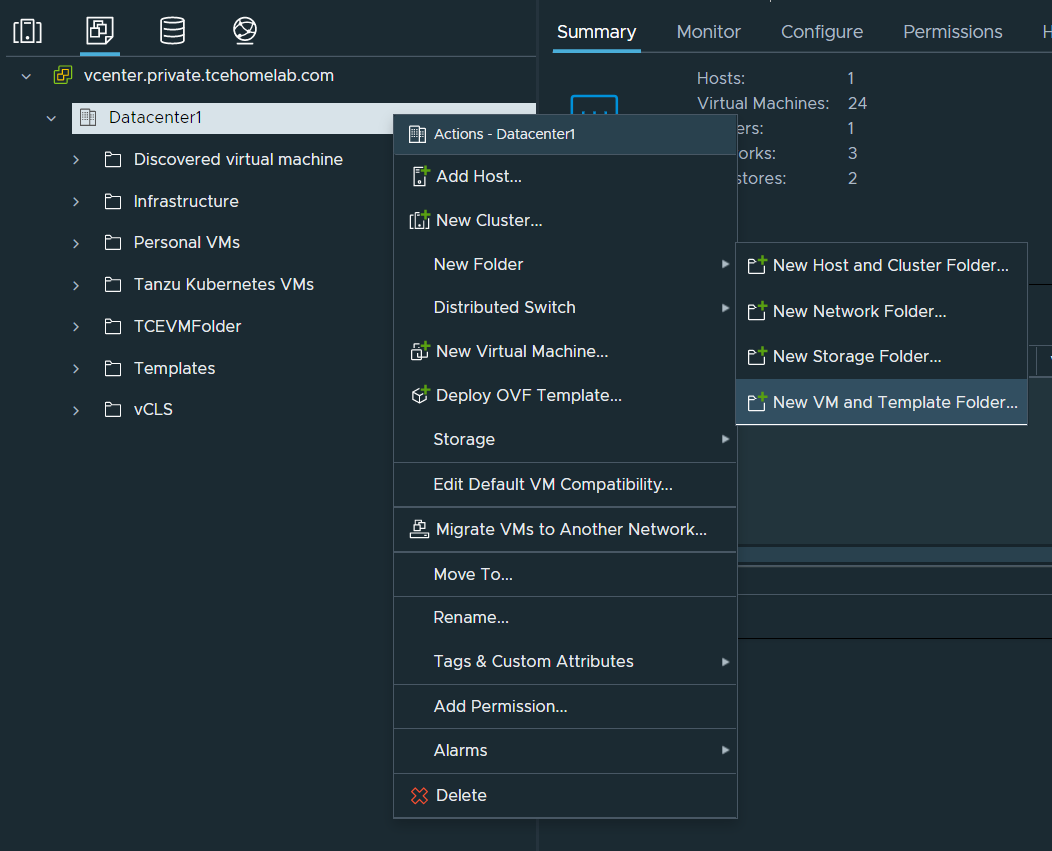
- A folder in which TCE can place its VMs. To create this, go to the VMs and Templates tab on vCenter, right click on your datacenter, and under New Folder select New VM and Template Folder. Give it a name (I called mine
TCEVMFolder).
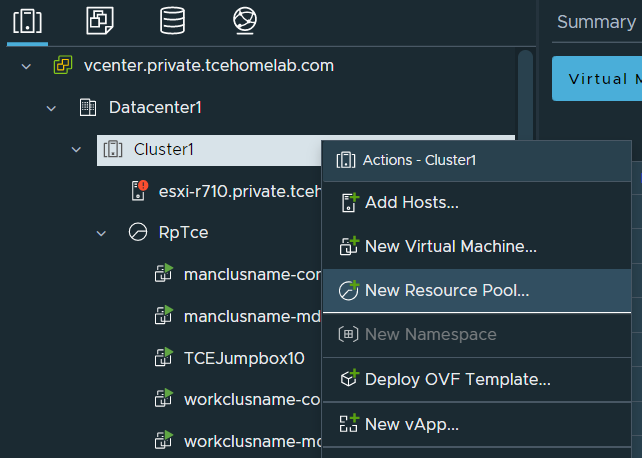
- Optional (but recommended): A resource pool in which TCE can place VMs. In the Hosts and Clusters tab, right click on the cluster in which you want to deploy TCE, then select New Resource pool. Give it a name (I called mine
RpTce), and leave the other settings at their default values.
- Check to make sure the datastore you are planning to use has sufficient storage for the control plane and worker node VMs.
Network
-
A DHCP server to connect the cluster node VMs that Tanzu Community Edition deploys. The node VMs must be able to connect to vSphere.
-
A set of available static virtual IP (VIP) addresses for the clusters that you create, one for each management and workload cluster. Each cluster requires a static IP address that is used to access the cluster’s Kubernetes control plane.
- Make sure that these IP addresses are not in the DHCP range, but are in the same subnet as the DHCP range.
-
Make sure that:
- Traffic is allowed out to vCenter Server from the network on which clusters will run.
- Traffic allowed between your local bootstrap machine and port 6443 of all VMs in the clusters you create. Port 6443 is where the Kubernetes API is exposed. In our case, the bootstrap machine will itself be a VM on vSphere.
- Traffic allowed between port 443 of all VMs in the clusters you create and vCenter Server. Port 443 is where the vCenter Server API is exposed.
-
The Network Time Protocol (NTP) service running on all hosts, and the hosts running on UTC.
Creating a template from the node OVA
During the jumpbox step you should’ve uploaded the node image from customer connect to vSphere. Right click on your resource pool for TCE (or if you don’t have one, on the cluster), then select New Virtual Machine. For creation type, select Deploy From Template, then select next. Select the node image OVA you uploaded. Review the details of the template, and accept the license agreement. Select the datastore on which you want TCE to place it’s VMs. Here you can also change the disk format to “Thin Provision” to use less space. Then, select the network on which you want TCE to place its VMs (this does not have to be the same network as the jumpbox). Finally, click on finish.
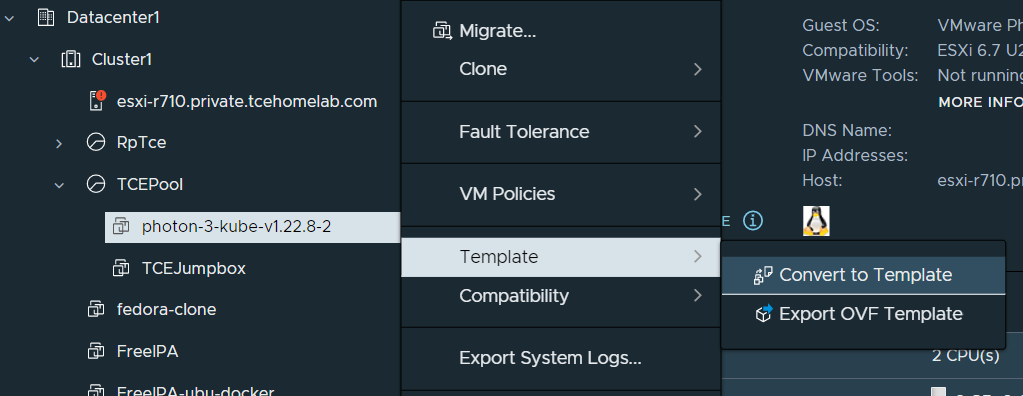
Once the VM has finished being created do not power it on. Right click the VM, and under template select “Convert to Template.” If you go to the VMs and Templates page you should see the template in the folder you selected.
You are now ready to deploy vSphere. In your bootstrap/jumpbox VM as the tceadmin user, execute the following command:
tanzu management-cluster create --ui --bind <VM ip here>:8080 --browser noneThis will start up the web ui, which you can access on your local machine with the port and IP you specified.
On the web ui, select vCenter. There are 8 parts to configuring the deployment:
- Enter the credentials for vCenter. Recommendation: use the TCE user account created as a part of jumpbox installation instructions.
- Select the number and type of nodes for the management cluster. Recommendation: development (single node) cluster of size medium or large for the control plane, and size large for the worker node. Choose smaller instances if your homelab is more resource constrained. Management cluster name can be whatever you want (in my case “manclusname”). Control plane IP should be an available static IP on the same subnet as the rest of the kubernetes network.
- Leave as default (blank), unless using VMware NSX.
- Leave as default (blank)
- If you click on VM folder a dropdown should appear with all of the folders on vSphere. Select the one you created earlier for TCE (in my case TCEVMFolder). Select the datastore you want TCE to place the management cluster VMs on. Select the resource pool you created earlier for TCE (in my case, TceRp).
- Select the network that the management cluster VMs will use. The control plane IP chosen earlier should be contained in this network. Cluster service and pod CIDRs can be left as default (unless you have existing networks that conflict with either).
- Optional: enter details for OIDC or LDAP. Click on the “Enable Identity Management Settings” toggle if you do not wish to.
- Select the template that was created earlier from the node OVA.
Once you click on Review Configuration, all of the settings that you entered will show up. At the bottom you can click on Deploy Management Cluster, which will start the deployment process.
Optional (alternative method): Copy the command shown in the CLI command equivalent box. Stop running the kickstart UI (using ctrl+c). Then paste this command onto the terminal of the jumpbox VM. Here you can customize options of the command, including log verbosity (-v 0-9) and the timeout (--timeout or -t, default 30m, can be increased for slower internet connections).
Part way through the cluster creation process you should see 2 VMs be created on vSphere, one for the control plane and another for the worker node. Once the installation process is completed, you can run kubectl get all -A to see the pods, services, daemonsets, deployments, and replicasets created by Tanzu, running on the management cluster.
You are now ready to deploy your first workload.